Setting up Windows 11 in a VM with Gnome Boxes
The endof10 is near and you should upgrade your remaining Windows 10 hardware to Linux, where possible.
Sometimes, you still need to have Microsoft Windows for collaborative Office products or Adobe products (or other specialized software).
Upgrade process for existing Windows 10 without UEFI
However, if you do not have UEFI in your existing Windows installation you probably also do not yet have a GPT partition layout. Instead this is using MBR which is incompatible with UEFI. Additionally to UEFI, Windows 11 also requires a Trusted Platform Modul (TPM).
So to upgrade an existing Windows 10 BIOS MBR installation one has to
- convert the disk to GPT using MBR2GPT
- add or enable UEFI
- add or enable TPM
This process is the same for virtualized hardware as for real hardware. I tried this for my VM but did run into an error with the first step.
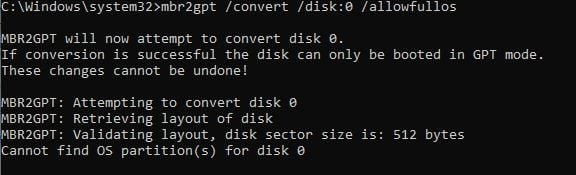
MBR2GPT did error
Well, I did not really expect this to work easily and was already prepared to just create a new VM - which is better anyway, as the old one is quite cluttered.
Windows 11 in Gnome Boxes with UEFI and TPM
Gnome Boxes already has identification for the requirements of Windows 11. However, this does not include the requirement of a TPM, as the setting is currently missing from libvirt-gconfig. And there is not a lot of traction going on in the related Issue.
So we must add the TPM manually, either using virt-manager to adjust the XML or customize the XML yourself using Preferences -> Edit Configuration.
Then adjust the config as follows (from this or that blog):
Find
<devices>...</devices>tag, scan all the child items and add or edit the the following line within the device section
<devices>
  ...
  <tpm model="tpm-crb">
    <backend type="emulator" version="2.0"/>
  </tpm>
  ...
</devices>
Finally, boot and install Windows 11.
Customization for guest-utils
GNOME Boxes uses SPICE video driver, which has support for dynamic screen sizing and clipboard. Creating a near-to-native experience for a virtualized Windows (except for the fan to sping up, as typically for Windows…).
We need to install three packages:
- VirtIO Drivers
- required for balooning
- required for VirtIO SCSI single disk on Proxmox during install
- includes qemu-guest-agent
- SPICE guest utils
- dynamic screen size
- clipboard
- only works with the VirtIO drivers, otherwise this does nothing
- SPICE WebDAV daemon
- additional daemon for folder sharing of SPICE
- in the “Devices” tab of the VM settings, this can share a local folder to map into VM through WebDAV
After a reboot, this has a very great experience where resizing of the window works easily and the clipboard is in sync as well.
Installing additional software
The main reason for me to have a Windows 11 VM is Office PowerPoint and Adobe Acrobat Reader.
My work uses Dynamic XFA PDFs for various workflows. Filling out such PDFs is, however, only supported on the Adobe PDF Reader, which in turn, is not available for Linux.
Additionally, I require to rapidly create some presentations, where PowerPoint is just the tool I turn to, as LibreOffice is not really sufficient for my needs.
Yet, installing Office is quite cumbersome, as Windows does not want to install Office, as it does not trust the installer created by Microsoft.

I even had to go through nudging
After telling Windows to keep the file, I had to click through some additional nudging, while telling me that the file is provided from Microsoft.
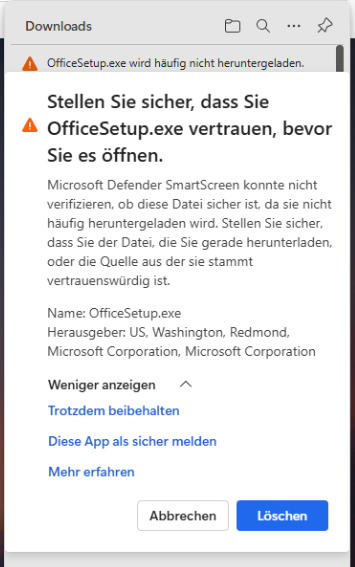
And some more nudging to not install Microsoft Office
Oh boy, I am happy that this does not happen on Linux and I have a proper package manager there.
Further highlights of Windows are the translation of the product name “Office” to the German word “Büro” as well as detecting my fresh created Windows 11 VM as a Windows 10 operating system.
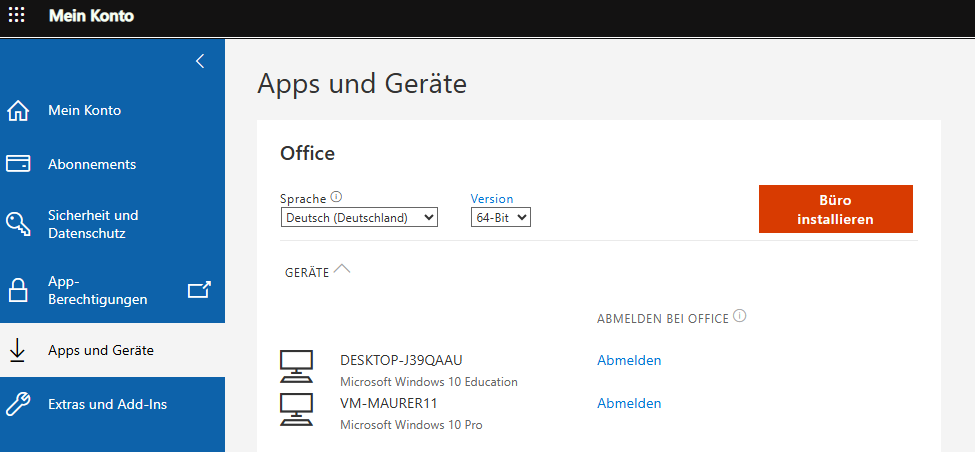
Microsoft also translates its own product name at the install button